Tuesday, 17 May 2011

WEEK 8 Boundary joist
BOUNDARY JOIST
Setting the boundary joist and clamping the mitre cut for fixing, when joining to boundary joists together. The team, here is happy with their work. Nail the boundary joist with 3 nails to each floor joist end. 25mm in from top and bottom edge amd one the middle.


Setting the boundary joist and clamping the mitre cut for fixing, when joining to boundary joists together. The team, here is happy with their work. Nail the boundary joist with 3 nails to each floor joist end. 25mm in from top and bottom edge amd one the middle.

Arlee is getting those notes down on what he has done for that morning. It is important to fill out the portfolio out everyday and 3 times a day. Fill out the material list, self assessments and the tool box talk.Transfer notes on what you have learnt and done that ay onto your blogger.

WEEK 8 Joists
FLOOR JOISTS


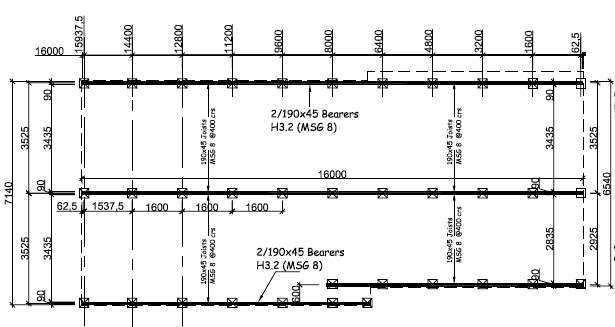
Bearers already for marking out joist spacing, wall positions and where service waste lands. Marking position for timber is marked clearly with a bold line and a X on one side of that line. The X indicate that is where the timber is positioned.

Once bearers are all marked out, set the joist on the X mark. Sorting out where different treated timber and lengths are required in floor plan.


Joist are all laid out and positioned with side of the house that is 15mm in from the outside edge of the bearer. This for the 30mm overhang of the boundary joist.

Once the 30mm overhang is positioned, check this with your stringline. Check the other side of the house and the overhang of the joist over the bearer will be 330mm to the stringline, then run another stringline -47mm from the 330mm stringline for boundary joist. Use a combination square to mark a plumb line from the singline, cut all joist to that -47mm line.
Monday, 16 May 2011
WEEK 7 Floor joists
FLOOR JOIST
The floor joists are sorted from the packet to see if the right lengths and quantity were delivered to site. The joist packet allowed for H3.2 joist in the kitchen.

The floor joists are sorted from the packet to see if the right lengths and quantity were delivered to site. The joist packet allowed for H3.2 joist in the kitchen.

Mark joist to plan and consider where walls land and service pipes will be ie. Toilet and shower waste pipes.
How do we provide a service area if a joist is in the way of a waste pipe?
Friday, 6 May 2011
WEEK 7 Jack studs
Once the sole plates are fixed into position, jack studs were nailed to the sole plate at 1600mm centers to the plans specifications.

Johnny and Arlee here cutting the jack studs to leveled height of the set string-line.


Once the jack studs are all cut to the -400mm from FFL, the bearers sat on top of the jack studs and fixed by two 100mm skewed nails to each jack stud, one each side of the bearer.


The jack studs and bearers are braced off and plumbed and measured for the correct width acording to the bearer plan.
What is the width from outside to outside of the bearers?
What is the measurement to the center.
If this is all correct, how would it make the next stage easier when installing?
Tuesday, 3 May 2011
WEEK 6 Profiles and footing


WEEK 6 Profiles
SETTING OUT PROFILES


Profiles are timber constructed frames to find the height of a finished floor level and the boundary of the building (house).
Profiles are a minimum of 900mm away from the marked peg (boundary of the building).
PROFILE PARTS
 Make sure the construction of the profile is sturdy, bracing will achieve this from moving. This is important when you start setting the string-line to find the building line it will not move and put the building (House) out of square.
PROFILE PARTS

Subscribe to:
Posts (Atom)